The CHM from LIDAR Plugin
The CHM from LIDAR plugin allows to compute the Canopy Height Model (CHM) starting from Lidar data, in particular DTM and DSM (First Impulse).
The main inputs of the plugin are the DSM and DTM file from different flight campaigns, for the computation of the CHM, and a vector file (format GeoPackage) that contains the tiles geometries which compose the survey campaign. By default this file, named tile_dsm_dtm.gpkg, contains the geometries and the information related to the data of Regione Veneto who funded the development of the plugin. Obviously, this file can be modified by the user including its own data. In order to create a new tile_dsm_dtm.gpkg file, it is recommended the use of the Lidar Tile Maker Plugin which has been developed to make the creation of the tiles file easier and hence to simplify the use of the CHM from LIDAR plugin to all users. The manual of the Lidar Tile Maker Plugin is available to this link: https://lidar-tile-maker-manuale.readthedocs.io/en/latest/
The * tile_dsm_dtm.gpkg * file is automatically loaded into the active QGIS project by starting the plugin. If the file has been already uploaded previously, it won’t be uploaded again but the plugin will make the existing one active. In the same way, in order to use a tile vector file obtained from the Lidar Tile Maker Plugin, it is sufficient to upload this file in the QGIS project before starting the CHM from LIDAR plugin. In this way, the plugin won’t load the default file but it will make the file created with the Lidar Tile Maker Plugin active. The tile vector layer, named * tile_dsm_dtm* has in the related attribute table all the necessary information to retrieve of the DSM and DTM file from which compute the CHM ( path file, file name, flight campaign name, coordinate reference system, etc.). Therefore the plugin selects the tiles depending on the input parameters provided by the user, then it automatically retrieves the related DSM and DTM file reading all necessary information (path file + filename) from the attribute table of the tile_dsm_dtm file.
NB: DO NOT rename the layer tile_dsm_dtm in the QGIS project, in fact the plugin makes layer active by name every time it is started. If the layer name is modified, the plugin won’t be able to recognize it hence the default file will be automatically uploaded in the QGIS project.
The CHM computation is automatically performed for all the tiles selcted depending on the input parameters provided by the user. It is possible to compute the CHM of all tile belonging to the specified flight campaign, or of all the tiles which intersect an Area of Intereset (AOI) defined by the user.
In the first case, the CHM of each tile belonging to the selected campaign is computed and saved with the file format and the CRS defined by the user in the chosen output folder. In the second case, the CHM of each tile which intersects the selected AOI is computed and saved with the file format and the CRS defined by the user in the chosen output folder. Moreover, it is also created a raster file of the computed CHM clipped along the boundary of the selected AOI. Also the raster clip file is saved with the file name, file format and the CRS defined by the user in the chosen output folder.
In the following, all the possible case histories, the parameters and in general the CHM from LIDAR plugin workflow will be described in detail.
Features and operation
As already mentioned, the main purpose of the CHM from LIDAR Plugin is the computatiuon of the CHM starting from Lidar data (DSM e DTM) obtained from the survey campaigns. The general workflow of the Plugin consists of:
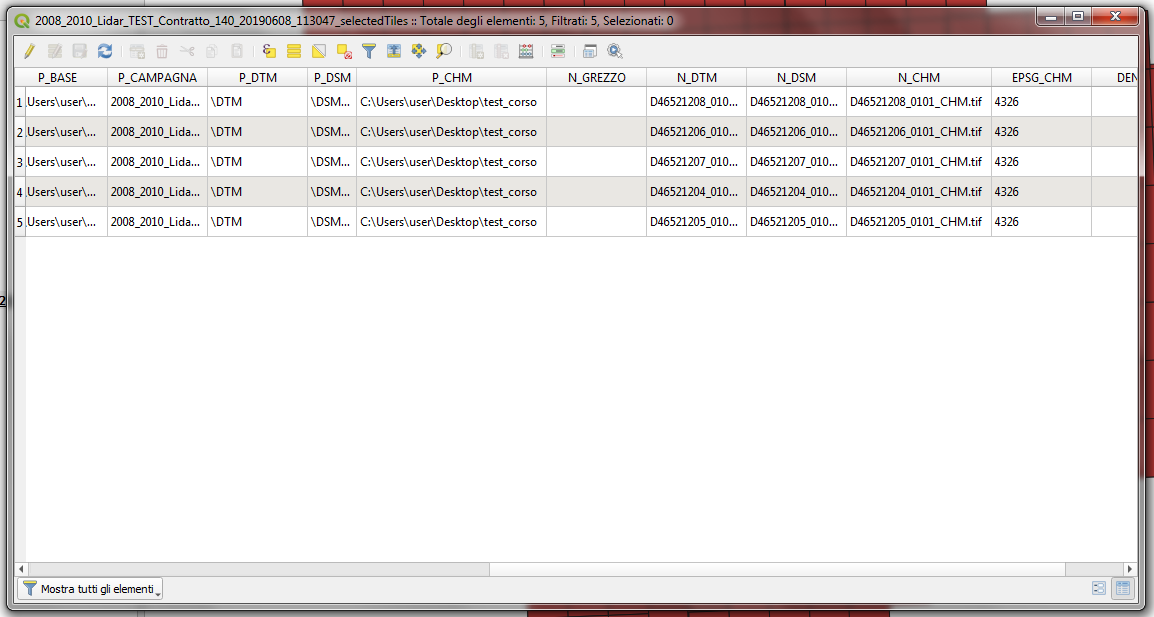
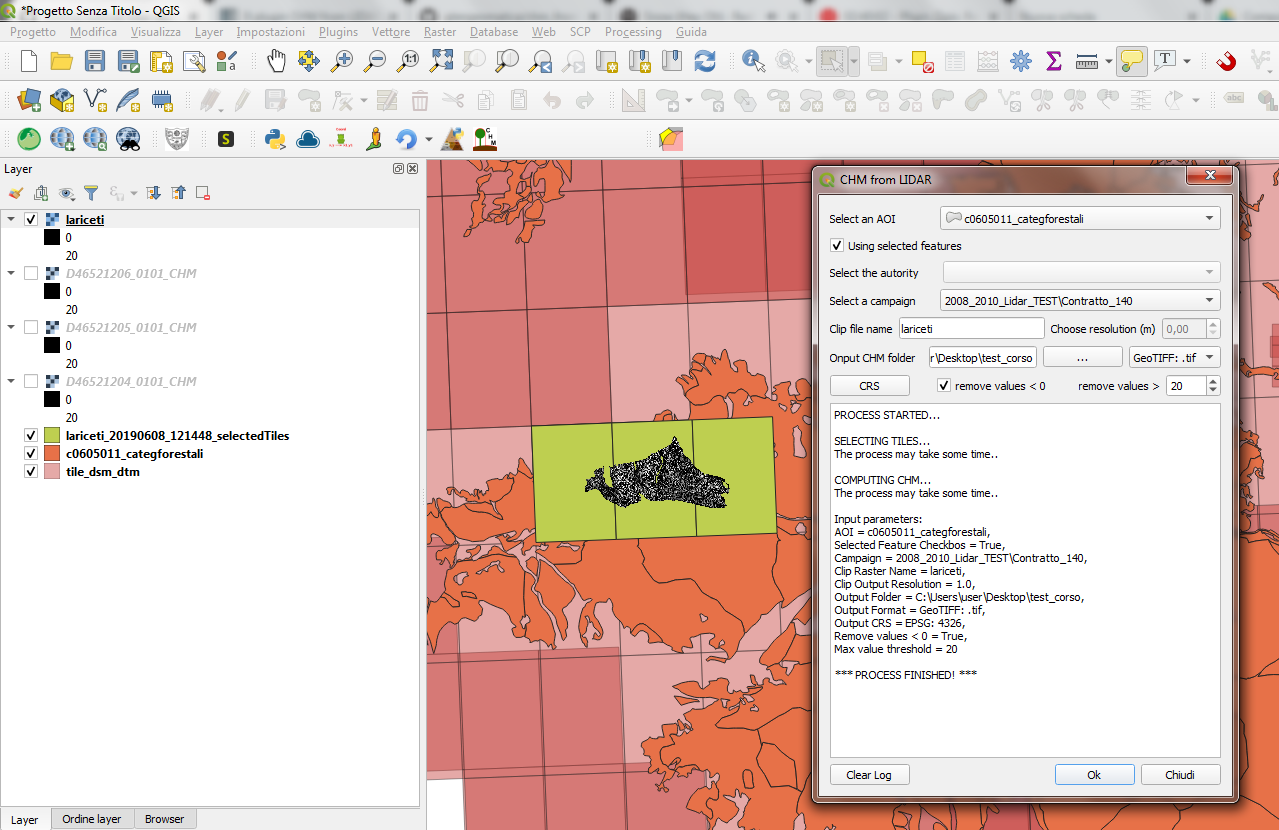
Selecting tiles from the vector layer tile_dsm_dtm (that is automatically uploaded and/or made active in the QGIS project starting the plugin). It contains the tiles deriving from all the flight campaigns made over the territory of Veneto region. The tiles are sected according to the input parameters defined by the user. For instance, choosing only the flight campaign, all the tiles belonging to the specified campaign will be selected. Choosing a campaign and an area of interest (AOI) all the tiles of the selected campaign which intersect the AOI given as input will be selected. If only the AOI is provided by the user, all the tiles which intersect the AOI will be selected regardless of the flight campaign they belong to. In this case, different situations can occur: all the selected tiles belong to a single campaign, the selected tiles belong to different campaigns but they do not overlap (adjacent tiles), the selected tiles belong to different campaigns and they overlap (eg. campaigns performed over the same area in different periods). The selected tiles will be saved in a new vector layer, which will be named using the campaign name if only the campaign has been specified, or using the clip file name if the AOI has been specified. Moreover the name of the new vector layer will also include the data of creation in order to keep record of the computed CHM and of the chosen AOI. All the information related to the computed CHM (output path, file name, file format and coordinate refererence system) will be automatically added to the attribute table of the vector layer created from the tiles selection.
Computing the CHM of the selected tiles. The CHM is computed for each selected tile. Files are saved in the output folder with the format and CRS provided by the user setting the input parameters from the graphical user interface. If the selection of the tiles is performed using an AOI, another raster file will be created. It consists of the CHM files clipped along the boundary of the selected AOI.
The final results, i.e. the CHM and the clip file, are automatically uploaded within the QGIS project.
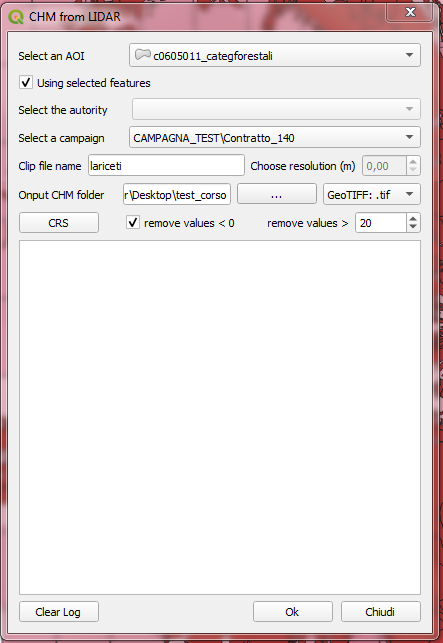
All the required input parameters are provided by the user through the graphical user interface that is shown clicking on the plugin icon in the toolbar.
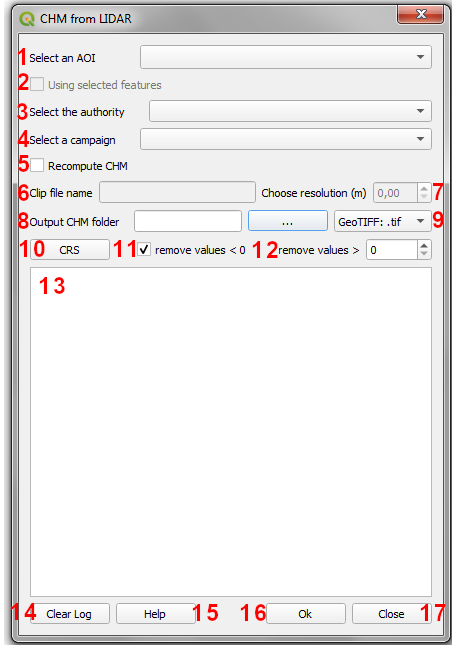
1 - Select an AOI: the user can select the vector layer containing the geometries of the AOI for which the CHM has to be computed. The drop-down menu lists all the polygonal vector layers loaded in the working QGIS project, therefore it is necessary to load the AOI vector layer in the QGIS project before running the plugin.
2 - Using selected features: if the selecetd AOI layer has selected geometries, the check box is enabled. Checking it only the selected features will be used. Therefore all the tiles (from layer tile_dsm_dtm) that intersect the selected features of the AOI layer will be selected. If the check bos is not checked, it will be used for the tiles selection the whole layer. If the AOI layer hasn’t selected features the check box will be disabled.
3 - Select the autority: among the different information stored in the attribute table of the tile layer (tile_dsm_dtm) it is also included the Authority who menaged the flight campaign. The drop-down menu lists all the authorities in the attribute table hence it is possible to select the desired authority and consequently visulize only the flight campaigns managed by the selected authority (see point 4) in the related drop-down menu.
4 - Select the campaign: according to the selected authority (see point 3), the drop-down menu lists all the campaigns managed by the authority. Then it will be possible to select the campaign for which the CHM has to be computed.
5 - Recompute CHM: if the paths and the names (respectively P_CHM and N_CHM fields) of already computed CHM files are found within the attribute table of the tile layer (tile_dsm_dtm), by default the plugin will use these files to proceed to the following computational steps (eg application of filters on negative values and/or threshold on maximum value, reprojection, conversion of file format, clip, etc.)according to the input parameters provided by the user. Checking the checkbox the CHM files will be recomputed instead, even if they are already included in the tile layer, and then the plugin will proceed to the following computational steps according to the input parameters provided by the user. While if the CHM files corresponding to the selected tiles are not found and the checkbox is not checked, the plugin will obviously compute the corresponding CHM files.
6 - Clip file name: if an AOI has been selected, it is necessary to provide a file name for the clipped CHM file. The user has to specify only the file name without the file format extension since it will be automatically added depending on the chosen file format. If the user does not provide the clip file name, the plugin will return a warning message to advise the user that the default name will be used to create the clip file (es. clip.*). NB: do not use spaces or special characters in the file name.
7 - Choose resolution (m): the user can select the spatial resolution, in meters, that will be used to resample the clip file. The CHM files of tiles are computed using the resolution of the DSM and DTM files, while regarding the clip file it is possible to specify a different resolution. The value is expressed in meters. If the user want to use a geographic reference system (eg. WGS84 units in degree), the resolution has to be expressed anyway in meters. The plugin will automatically convert the provided value to the unit corresponding to the chosen reference system. If the user does not provide a resolution value (hence the spin box keeps the default value 0.00), the DSM and DTM resolution will be used to compute the clip file. The resolution spin box will be enabled if only the AOI is selected and no campaign is specified. In fact, if the campaign is selected too, the resolution spin box will be disabled and the clip file will be compute using the same resolution of the CHM, i.e. the one of the DSM and DTM. NB: if the user choose a resolution value lower than the DSM/DTM one, the plugin will return a warning message.
8 - Output CHM folder: clicking on the button (…) a dialog window will be opened, like file manager, where it will be possible to browse the computer and select the folder where all the output of the process will be saved (CHM file of each tile and the clip file). Once the folder has been selected the related path appears in the text form next to the button. NB: if the user does not select an output folder, the plugin will return a message error, the process will be stopped and the user, the user will be able to provide the output folder and then the process can be run again.
9 - choose the file format: it is possible to select the output file format from the drop-down menu. All the results of the procces, both the CHm of each tile and the clip file, will be saved using the selected format. By default the selected format is GeoTIFF.
10 - choose the reference system: clicking on the button the QGIS dialog window for setting the CRS will be opened. By default the plugin uses the reference system of the DSM and DTM files. If the users selects a different reference system, the output of the process will be reprojectd in the specified reference system.
11 - remove values < 0: the checkbox allows to remove possible negative values from the computed CHM. If the box is checked, the negative value of the computed CHM will be set equal to 0. By default the box is checked but removing the flag the CHM will be computed and it could have negative values.
12 - remove values > xx: defining a integer numerical value in the spin box, the values greater then the specified threshold will be removed from the CHM file. As for the case of negative values, all the pixels with value greater then the specified threshold will be set equal to the threshold value itsel. By default the spin box value is 0. If the user does not specified a different threshold value, the CHM file will be returned with the actual maximum value.
13 - Log: it is the text area in which all the messages aboutthe computation progress will be shown during the process. Also warning and error messages wil be shown here. Warning messages do not stop the process, while error messages stop the process and the user will be able to modify the input parameters and then run the process again. At the end of the process, if everythin works fine, a report of the provided input parameters will be shown. This message is then followed by another message: ‘Process finished’.
14 - Clear Log: the button removes all the messages related to previous process from the log area.
15 - Help: the button opens a web browser and automatically shows the web page of the plugin manual.
16 - OK: it is the button that runs the process. When the input parameters are defined by the user, clicking the OK button the process will start. As already mentioned (see point 12), in case of error message it will be possible to modify the input parameters and then run the process again clicking on the OK button.
17 - Close: the plugin graphical user interface will remain open and active until the user closes it clicking on the Close button. In thi way, the graphical user interface will be closed and the input parameters will be set to the default value.
Examples
Choosing only the flight campaign
Choosing only the flight campaign, the CHM is computed for each tile belonging to the selected campaign.
In the case of the flight campaign only it is possible to:
choose the file format,
choose the reference system,
remove negative values
remove values greater than a certain threshold
Instead all the functions related to the clip file generation are disabled. In fact, if no AOI is selected, any clip file will be created.
Clicking on the OK button the computation process starts.
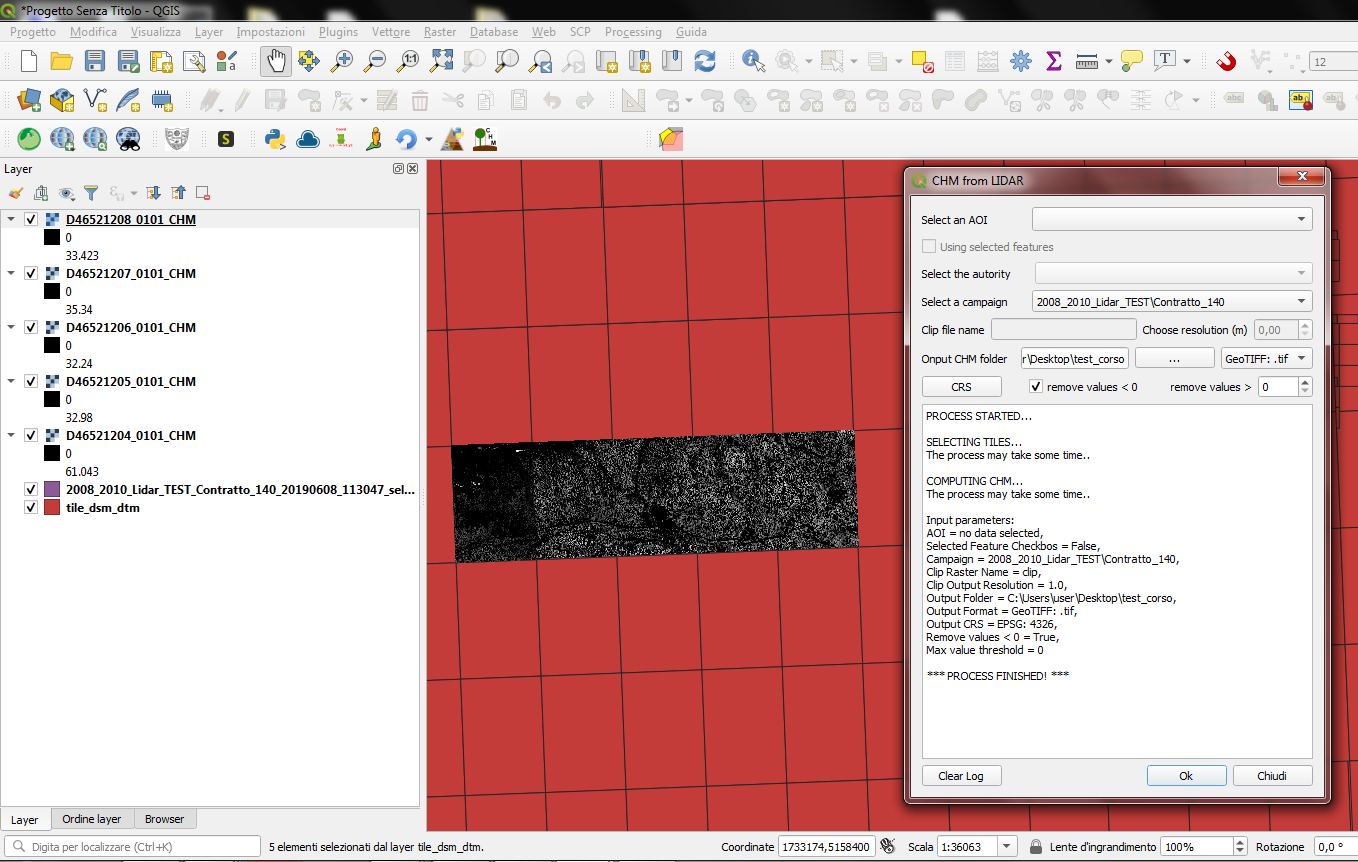
The computed CHM files and the vector layer with the selected tiles are automatically loaded in the QGIS project. Looking at the attribute table of the created vector layer, it is noted that the path to the output folder has been automatically added to the P_CHM field, the name with related extension of the CHM file has been added to the N_CHM field and the EPSG code of the CHM reference system has been added to the EPSG_CHM field.
Choosing an Area of Interest and a Flight Campaign
In this case the CHM is computed for all the tiles of the selected Flight Campaign which intersect the selected Areo of Interest.
If the AOI vector layer has selected features, the Using selected features checkbox is enabled. Checking the box, only the selected features will be used otherwise the whole layer will be considered.
In the case of a selected AOI and a selected Campaign it is possibile to:
choose the file format,
choose the reference system,
remove negative values
remove values greater than a certain threshold
Instead the function related to the choice of the spatial resolution of the clip file is disabled. In fact choosing both an AOI and a campaign the clip file is created using the resolution of the DSM/DTM files.
Clicking on the OK button the computation process starts.
The computed CHM files, the clip file and the vector layer with the selected tiles are automatically loaded in the QGIS project. Looking at the attribute table of the created vector layer, it is noted that the path to the output folder has been automatically added to the P_CHM field, the name with related extension of the CHM file has been added to the N_CHM field and the EPSG code of the CHM reference system has been added to the EPSG_CHM field.
Choosing only the Area of Interest
It is the case in which the user needs to compute the CHM for a certain area of interest without knowing the flight campaigns which intersect the area itself. In this case three different situations can occur:
1 - the AOI intersects a single flight campaign: the CHM of all the tiles that intersect the AOI will be compute and the clip file will be created. In this case the spatial resolution of the DSM/DTM files will be used.
2 - the AOI intersect several campaigns but they do not overlap: the CHM of all the tiles that intersect the AOI will be compute and the clip file will be created. In this case two check will be performed during the computation. The former is about the reference system and the latter is about the resolution. If the campaigns have different reference system the process is stopped and the plugin returns a warning message asking the user to select a reference system unless it has already been selected setting the input parameters.In the same way, if the campaigns have different resolution and no input resolution has been set, the greater one will be automatically used.
3 - the AOI intersect several campaigns and they overlap: the process is stopped and a log message will be returned. The message lists some information related to the intersected campaigns (authority, name, year and resolution) asking the user to select one of the listed campaign.